Barometric sensor cleaning
-
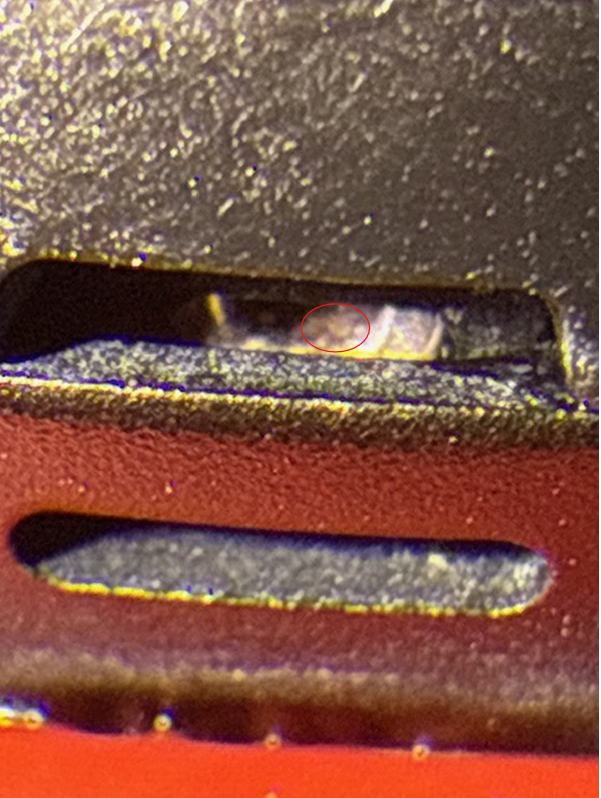
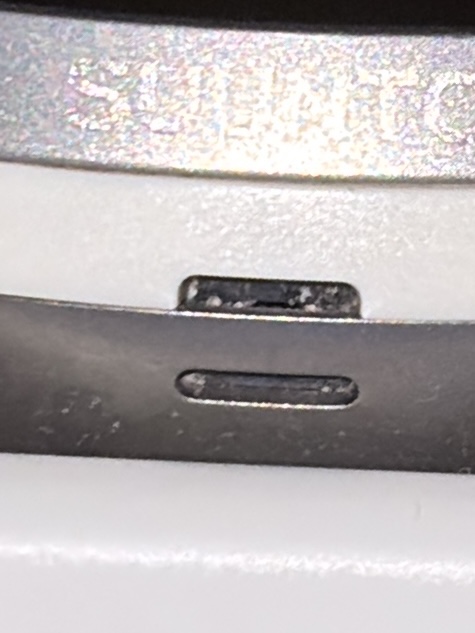
I’ve recently been getting altitude values that are way off reality with my Suunto Race, it’s always been pretty spot on so have never thought about the sensor needing a clean.
On close up examination using the magnifier app on my phone it appeared to have some crap in there so have been attempting to clean it (submerging the watch in water with a drop of washing up liquid for an hour or so then rinsing under a slow running tap) & I seem to have cleared most of it but the readings are still off.
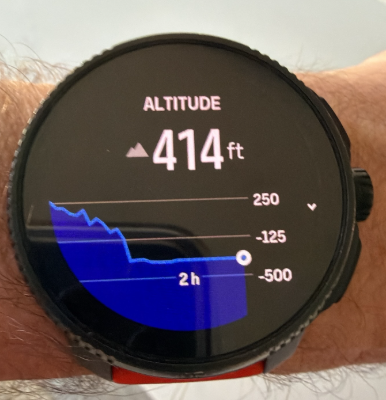
I’m currently sat at home which is 165ft above sea level & it says I’m at 414ft (but the graph shows minus values).
Would someone with a Race 1 that gives good altitude readings (and a clean sensor) share a close up pic so I can see if my cleaning is going in the right direction please

I bought the watch in January 2024 so has just come out of warranty #justmyluck
Many thanks
Race
9 Peak
Ambit 3 Peak
Ambit 2R (sold)
Suunto T3d (expired) -
@Mattg576 What is the pressure reading and does that match with the weather stations around you? Maybe the altitude is off because of the water pressure.
-
@Mattg576 don’t know if it helps, but mine works and looks like this
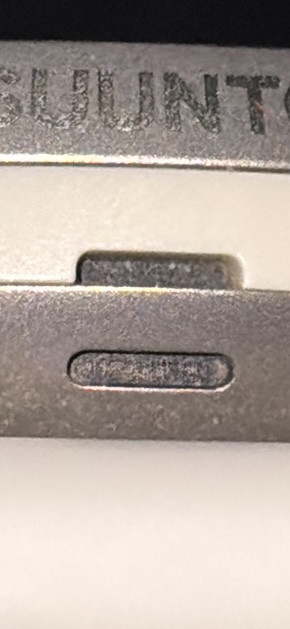
There seem to be small „slits“ on the black inside
-
@ChrisA thanks Chris
-
@surfboomerang pressure readings are miles off reality as well
-
@Mattg576
Probably HW default now.
No luck it is out of 2 years warranty, but it might worth ask support, just in case… -
@Mff73 I spent some time over the weekend following some ChatGPT ‘deep cleaning’ suggestions & now getting stable results at home.
Will be giving it a proper test in the field after work

-
@Mattg576 Can you tell us how you clean it?
I’m also interested. -
@Tony-Monteiro Here you go Tony.
STEP 1 — Warm Water Softening (3–5 minutes)
Purpose: Soften the residue so it can detach.Turn on warm tap water (not hot — you should be able to hold your hand under it comfortably).
Hold the baro port facing downward.
Let water flow over the port continuously for 3–5 minutes.Tip:
Tilt the watch slightly so the water sheet runs across the opening, not directly into it — this improves the “shearing” action that helps loosen residue.STEP 2 — Gentle Surface Brushing (very important)
Purpose: Break the surface tension holding residue to the membrane.
Use one of the following:
 ️ A very soft toothbrush (kids’ brushes are ideal)
️ A makeup/eyelash brush (excellent because bristles are very fine)
️ A soft camera‑lens brush
How to brush:Wet the brush in warm water (no soap at all).
Gently sweep the bristles over the opening, not into it.
Brush in tiny circles around the rim of the opening.
Continue for 20–30 seconds only.What you’re trying to do:
You’re not trying to scrape the membrane — you’re loosening residue sitting on the outer surface.
If the residue is soap film or dried sweat salts, this brushing step is what usually finally dislodges it.STEP 3 — Warm Water Soak (clean water only) — 20 minutes
Purpose: Allow water to wick into tiny gaps behind the residue.Place the watch in a bowl of clean warm water (no detergent this time).
Submerge the baro port fully.
Leave for 20 minutes.Why:
Detergent can leave a film, so for the second clean we don’t use any soap. Plain warm water actually dissolves many residue types better at this stage.STEP 4 — “Pulsed” Rinse (60–90 seconds)
Purpose: To push loosened residue out with controlled flow.Hold the baro port downward again under warm running water.
Every ~10 seconds, rotate the watch slightly so the water hits:directly above the port
slightly from the left
slightly from the rightContinue for 1–1.5 minutes.
This creates small pressure variations that help flush out loosened debris.
STEP 5 — Drying Phase (critical!)
Purpose: Avoid moisture being mistaken for pressure changes.Place the watch on a table with the baro port facing downward.
Dry for 2–3 hours minimum.
If possible, place the watch in a warm dry room but not near a heater.This ensures the membrane fully dries and gives accurate readings during your next test.
🧪 STEP 6 — Post‑Cleaning Test (same as earlier)
Once dry:
A. Idle Stability TestManually set altitude to your known value (165 ft).
Close the altitude widget.
Wait 10–15 minutes.
Reopen and verify stability.If it’s stable → the baro baseline is good.
B. Movement Test (very important this time)Start a walking activity.
Walk on flat ground for 10–15 minutes.
Sync to Suunto App.
Check ascent:0–10 ft = perfect
10–30 ft = still some residue, may improve after another rinse
30+ ft = still noisy, more cleaning likely needed
100+ ft = obstruction still significant🧭 What to Look For After This Cleaning
️ If altitude is now stable and ascent returns to normal
→ The problem is solved.
️ If altitude is stable but ascent is still a bit high
→ You may need one more cleaning cycle, but you are very close.
️ If altitude still collapses or shows huge errors
→ The residue may be under the protective membrane, and professional service may be required — but based on your last test, this appears unlikely.Race
9 Peak
Ambit 3 Peak
Ambit 2R (sold)
Suunto T3d (expired) -
I repeated this several times & extended the warm water soak to over an hour (refreshing the water as it cooled)
The magnifier app on my iPhone was a great help & allowed me to see when the crap inside was saturated & more likely to flush out.
I think there’s still some left in there & will get a super fine soft artist brush that I’ll keep for cleaning again in the future.
Sensor seems stable at home now & on a dog walk yesterday I got decent results, I will be running a very familiar route today so will compare the ascent values with previous runs prior to the erratic recent results.
-
@Mattg576 thanks a lot
-
A week on & I’ve done a good mix of walks & runs, some hilly & some flat (48 miles with 5111ft ascent).
The Race has reported spot on ascent values throughout so the cleaning process above definitely works

-
I have the same problem with the values of the alti meter. Really extremely overestimatied vales. I tried already sevytimes the cleaning procedure but it doesn’t help. Really disappointing.
-
E estragio referenced this topic
Hello! It looks like you're interested in this conversation, but you don't have an account yet.
Getting fed up of having to scroll through the same posts each visit? When you register for an account, you'll always come back to exactly where you were before, and choose to be notified of new replies (either via email, or push notification). You'll also be able to save bookmarks and upvote posts to show your appreciation to other community members.
With your input, this post could be even better 💗
Register Login